Thursday, August 12, 2010

1983 Fleetwood Pace Arrow Motor-home


Since we are into vintage travel trailers we decided to try our hand in the restoration of a vintage motor-home, so we went ahead and picked up a 1983 Fleetwood Pace Arrow motor-home.

We started out small, by replacing things like awning pull straps, lights and lost lens. Also major cleaning, being the previous owner had a stroke and stopped maintaining it due to that stroke, so it is in a state of disrepair. We have also made minor repairs to a leaky kitchen faucet and the Nutone Food Center.

Worked to begin resealing the motor-home from leaks, sealed many small areas with silicone, but the major job is yet to come once the weather cools a bit, need to get onto the roof and clean it and then reseal it to prevent leaks with the pending fall weather.

We did start our first major project last week end 8/8/2010 by removing all of the kitchen and bedroom carpet and all of the sheet flooring from the kitchen. We did it for two reasons, first and foremost we felt what seems to be a spongy floor, so we suspected water damage, so we wanted to see how much damage there was, we discovered that it looks as if the kitchen floor has already been replaced once, because not only does the plywood look newer but they used nails to hold it down whereas in the hall and bedroom only screws were used. We hope to be able to unscrew many of these older floor boards and replace it with newer boards, so that the floor has more integrity. Also want the new carpet and sheet floor to freshens up the dated motor-home.
 

Wednesday, August 11, 2010

Removed and re-framed the floor

The floor in our new [new to us] 83 Fleetwood Pace Arrow seems spongy in a couple areas so before I laid new carpet and sheet flooring I wanted to inspect and repair the floor, so we would not develop any further problems down the road.

Again I was really surprised about the really poor workmanship that I discovered once I pulled the carpet off. I noticed as I mentioned before that it looked if the floor was cut open and relaid using the same plywood, and after removal of the floor I saw they installed two wood cross members and it was not done very well, the connections were weak and barely holding,  I wished I was a welder  so I could add new metal cross-members, but I am not so I have also use wood. I plan to re-frame the opening before reinstalling a new 1/2" plywood floor that I plan to seal with paint beforehand.


I will add more photos as the process moves forward.


Completed the floor re-framing, I am not completely happy with the outcome but it has to be better than it was. Next week end I will cut and try to get the new floor wood installed


Well yesterday I cut out the new floor board and sealed it and got it installed today, afterword I used metal duct tape and sealed the seams to insure that everything was solid.

Tuesday, August 10, 2010

Installed New Sheet Flooring Today Sat. 9/4/2010

Installed the new sheet flooring today, and tomorrow I will begin the aluminum trim. We decided on a marble look, it is supposed to be black but we thought it was more bluish perfect for our floor remolding.

New Carpet Installation 9/6/2010- Saturday 9/11/10-Sunday 9/12/2010

Well on this labor day I installed the small section of sheet flooring in the bathroom and also installed all of the new carpet tract strips so I am ready to get the new carpet installed next week end.

Well today Sept. 11th, I went ahead and installed new carpet padding and cut and performed the first trimming of the new carpet. Tomorrow I hope to finish the carpet installation by stretching and the final tug and trimming. I laid it out to allow it to flatten after having been rolled since buying it.


Completed the carpet installation today, next week I will move onto replacing the kitchen back-splash

Monday, August 9, 2010

Replacing the gas fill suround

When I bought the motor-home the gas filler surround was broken and had some repairs made on it, but there were still large cracked and I did not want to risk the gas filler tube developing a problem after we started getting some use from this motor-home. I was lucky enough to locate a company who re-manufactured these gas filler surrounds from fiberglass, the stock one as merely thin plastic. I don't know why I was surprised how cheaply the old one was, and I did discovered many problems with the new one that was molded from fiberglass, the stock one was thin and flexible the fiberglass one was not, so even after the fact of taking the care to make sure everything thing lined up to fit properly, it did not matter much because I still has to grade and shave it so it would lay flat aganist the side of the motor-home.
I finally got it installed, it would not go one squarely, due to the tension of the filler tube and the surround being as rigid as it was, but none the less, I settle to the position I was able to get.
While the gas door was off I went ahead and repainted it. I used window putty tape to install the door to the new filler surround and then screw it back on, of course I had to re-drill many of the screw hole due to the fact the new filler surround was larger that the old stock one.
There was the same gaps between the door and the side of the motor-home, so I filled this gap in with plumber's putty and then painted it to match it up.


Beginning the installation of the kitchen back-splash Sunday 9/12/2010

The original wall paper was peeling so we decided to upgrade the back-splash with an embossed rubbed bronze panels.


Sunday Sept 19, 2010 I completed the installation of the rubbed bronze panel and then also added aluminum stock as molding to frame it:


Repalce the range hood fan / Reinstalled Sunday Oct 3rd. 2010

Surprise how hard it was to locate a replacement fan for the one that was missing in the stove hood, first I installed a computer fan but I thought it may not move enough air, so I ended up buying a cheap auto 12 volt car osculating fan, which I disassembled and harvested all usable parts, made a aluminum hanger bracket and then installed it in the range hood, I will swap the fan polarity to make it run back ward once I get it reinstalled in the motor home.

I also striped the paint off it when I discovered rust and repainted it with a almond color paint

Today after painting the range hood, I rewired the lights , replace both of them, installed the fan, I reinstalled the range hood back into the kitchen.
I also also install a strip of the rubbed bronze panel at the lip to transition it into the new backslash.


Work completed on Sunday Nov 7, 2010

Well today I finally replaced the broken slider on my awning, was surprised how hard it was to mushroom the rivet, but none the less got it repaired and now we can practice lowing and raising it.

I also completed the sealing of the roof, first in the rear where we can see there was once a roof leak I installed 6" wide strips of Mule-skin and then sealed the balance of the seam with a clear roof sealer.

That leak had already been repaired, but we figured it better safe than sorry.

I also began cleaning up the paint job with rattle cans, the driver side seen to be worst off than the right side, for unknown reasons.

Installation a battery disconnect switch and rewiring the batteries banks


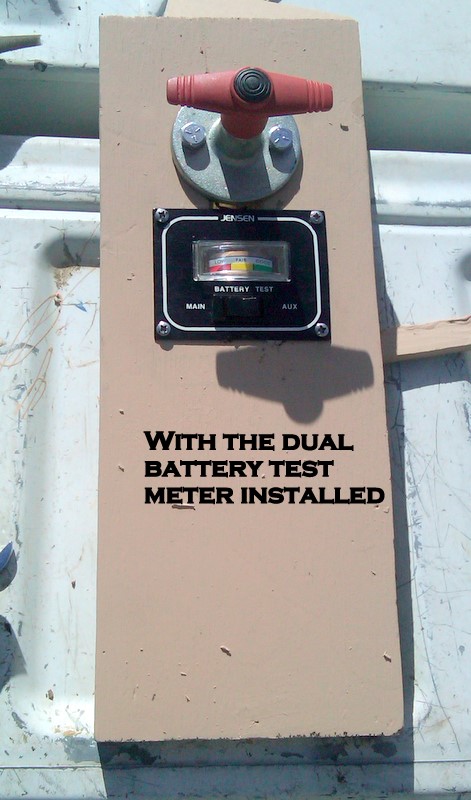
The PO, did little to make things easy, and the batteries were no exception, everything seemed to be jerry-rigged, and also there were far too many wires going to each post, so first I decided to install a battery disconnect switch to disconnect the battery from the house and engine to help prevent parasitic drain, it seems as if no matter what I did the batteries went dead. So that being said, I was just going to rewire everything to clean things up, but after posting a question on my motorhome forums everyone said I should fuse them again , because it would make things much easier to check the fuses from that point of connection instead of looking for a problem in the stock fuse panels, I plan to leave them in place, and I was hoping to fuse each circuit, and then run a single heavy wire to each post instead of the 10 or so that are there now, I also bought and installed in the wood panel I built a dual battery test meter so I am able to test the basic battery condition once I reconnect the battery by switch.

So I begin by taking a section of 3/4" plywood, and painted it to help preserver it, then I cut the holes for the cut off switch and the battery condition meter, with 2 /10 fuse gang panel to allow me to again take the many wires to a few, which will allow me to clean the battery connection and allow me to service the batteries because now they will be easier to disconnect.


Sunday December 26 2010 decided to install and began to rewire the systems
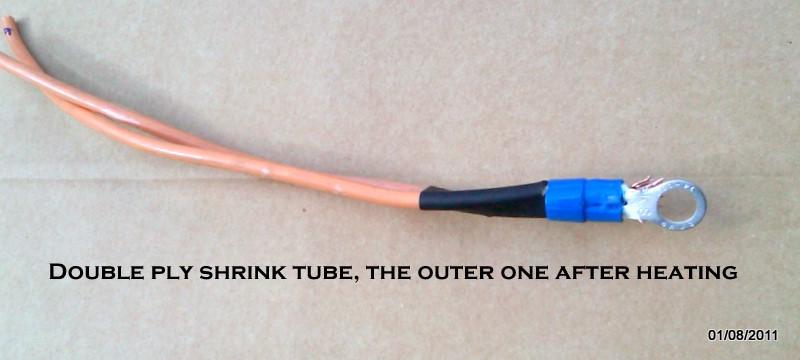
Today 12/31/2010 I went back to pulling the wires over to the new gang fuse panels, tried to solder all of the connections and splices, but discovered that soldering in the cold doesn't work very well, the lighter gauge wires were not much problem but when it can't to the 10 gauge I cold not get it hot enough I ended up using a butt crimp connection on one of them going over every connection with shrink tubing to make the
connection clean , I hope to get back to to tomorrow if it so not so cold. I also lightly coated the connections with dielectric grease and reconnect the wire connectors.


Today Saturday Jan 1st 2011 I completed the wiring of the fuse battery disconnect panel, tomorrow I hope to be able to install the two new Optima blue-top house batteries and the starter battery, surprised again of the very limited space, I wanted to upgrade the battery tray but due to limited space I only had 1" of free room on the tray, I was very limted on what I was able to do.
Today I was able to get the battries banks reinstalled and rewired


Was very happy it started first thing, but I must have not wired the battery disconnect switch correctly because it started in both positions, so I will have to investigate what I did wrong. I still have to wire the fuse panels and the voltage meter in, but so far I guess so good

Well today Saturday 01 08 2011 I ended up making a 8ga "Y" split cable to tie the 2 panel into the battery


When I started adding fuses, many blew so I continue replacing fuses until they stopped blowing. Ended up that four wires blew every fuse I tried so I pulled them after thinking that they must be ground wires and moved them over to the negative battery post. I went back to try and track what fuse powered what and was only able to ID a few wires, so I don't understand what is going on, but I will continue trying , I really hope that the cost and time I put into this upgrade was not nothing but a total waste of time. The battery cut off switch still does not work, this morning I switched the wires from the isolator to the solenoid, so there must with be a cable by passing the current or there is another problem, but at least I have it in place and I will continue trying to resolve the problem as I move forward

I also added another battery disconnect switch to the "Y' split cable I created at least I know there will be no parasitic drain. I also installed a on board battery maintainer to insure we are able to keep the battery banks charged at all times. as well as still another disconnect switch between the house batteries and the starting battery, rewiring everything the same way I took them off, may be a problem with everything still being connected, but I did not know another way to do it and hopefully will resolve it once I be come more familiar with  the D/C system, like I said before at least everything is now in place , I also now have many areas to pull power from as I replace the fog light and replace the windshield washer assembly that the PO removed, etc. The dual battery test switch did end up working, so far each test only showed each battery as only fair, so I hope that after charging them today I will get a battery reading , or I may find that the test too was not worth the effort, only time will tell.

Tomorrow I will continue tracing wires and hopefully dial everything end, but at least everything seem to again work before I stoppled working today, I also hope to be able to make new battery cables to replace the ones I create just to start this project, I will save the ones I threw together as back ups, look forward to seeing how my new Anchor battery crimper going to work.   Well today Sunday the 9th of Jan 2011, I replace the fog lights and wired it into the existing switch the PO installed.

Today something odd occurred, the engine would not turn off via the key switch, I had to go out and disconnect the connecting I installed to power up the fuse panels, I began pulling battery cable and then the engine failed to start, put them all back in the same spot and then the next few times the engine started and stopped by the key switch. I know I will have to remove as many of the s extra battery cable to prevent them from powering the system up, so I guess this will end up being a timely process, because I have to undo everything the PO did, and I hope to be able to get everything to work with as few battery cable connected as possible, but with my luck nothing I do will work and I will have to maintain it as it was.

Really freaked out this week end, after I thought every thing worked after the rewiring I went to install a new windshield washer being the PO took the old one out, so I first removed the wiper arms, then tested the wiper only to discover they no longer worked, so I worked all week end but finally was able to locate the problem the wiper wire was on the positive post when it should have been connected to the negative post, I first added it to the former only to have it not work when the engine was running and just because I was completely lost I tried to add it to the negative post only to find it corrected the problem.
So I went ahead and made a base for the windshield washer reservoir, painted and added the reservoir hanger and then the reservoir, installing it into the only area I could in the motorhome. I also went ahead and stripped and painted the wiper arms.


Next week I hope to make the fitting that will connect the rubber hoses from the inside under the hood to the outside and connect it all together and then reconnect it to the wiper arm, if that all works I will wire in a new switch under the inside dash.